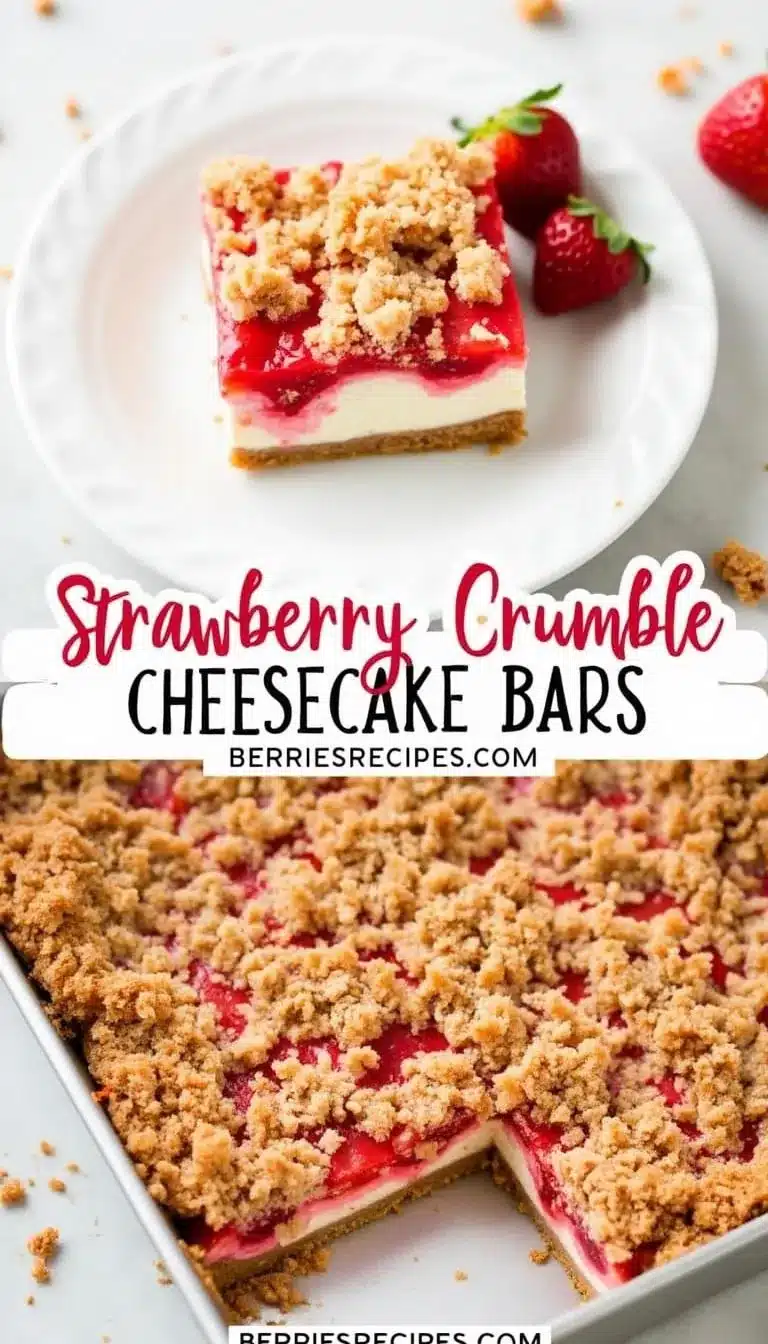
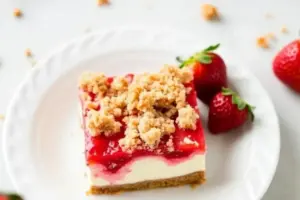
There’s something magical about the combination of creamy cheesecake, sweet strawberries, and a buttery crumble topping. These Strawberry Crumble Cheesecake Bars are the kind of dessert that brings summer straight to your plate. Whether you’re hosting a backyard barbecue, heading to a picnic, or simply craving a fruity treat, this recipe is just what you need. The best part? These bars are ridiculously easy to make and absolutely impossible to resist.
Picture this: a buttery crust as the base, a luscious cheesecake layer with a swirl of fresh strawberry goodness, and a golden crumble topping that’s perfectly crisp. Sounds amazing, right? Let me walk you through why this recipe holds a special place in my heart and how you can recreate these dreamy bars in your kitchen.
The Story Behind Strawberry Crumble Cheesecake Bars
Strawberries have always been one of my favorite fruits. They remind me of summer afternoons spent at the local berry farm, plucking the juiciest ones straight from the vine. This recipe is inspired by those memories and my love for cheesecake – because let’s face it, cheesecake makes everything better.
The idea for these bars came from wanting something portable yet indulgent. A full cheesecake can be a bit much for casual gatherings, but bars? They’re perfect. They slice beautifully, travel well, and offer just the right balance of creamy and crumbly. Plus, adding a crumble topping gives them a rustic charm that feels both comforting and fancy.
Over the years, I’ve tweaked the recipe to make it as foolproof as possible. From experimenting with the crust to perfecting the strawberry filling, this version is the one I always come back to. It’s ideal for showcasing fresh summer strawberries, but you can also use frozen ones if that’s what you have on hand. Trust me, this dessert is a crowd-pleaser through and through!
Let’s Talk Ingredients
When it comes to baking, the quality of your ingredients can make all the difference. Here’s what you’ll need to make these Strawberry Crumble Cheesecake Bars, along with some tips and substitution ideas:
For the Crust
- All-purpose flour: The base of the crust. You can swap it for a 1:1 gluten-free flour blend if needed.
- Granulated sugar: Adds a hint of sweetness.
- Unsalted butter: Cold butter is key for a flaky crust. If you only have salted butter, reduce the added salt.
For the Cheesecake Layer
- Cream cheese: Use full-fat cream cheese for the creamiest texture. Let it soften at room temperature for easier mixing.
- Sugar: Balances the tanginess of the cream cheese.
- Egg: Helps bind the cheesecake layer. A flax egg can work as a substitute if you need an egg-free option.
- Vanilla extract: Adds warmth and depth of flavor.
For the Strawberry Filling
- Fresh strawberries: The star of the show! If using frozen, thaw and drain them first.
- Lemon juice: Enhances the natural sweetness of the strawberries.
- Cornstarch: Thickens the filling for a jammy consistency.
For the Crumble Topping
- Rolled oats: Adds texture and nuttiness.
- Brown sugar: Provides a caramel-like sweetness.
- Butter: Creates that irresistibly crisp topping.
Keep in mind, you can adjust the sugar levels slightly based on the sweetness of your strawberries. And if you’re feeling adventurous, try mixing in a handful of chopped nuts or shredded coconut into the crumble topping!
Equipment You’ll Need
Here’s the kitchen gear you’ll want to have on hand:
- 9×9-inch baking pan: Perfect for evenly baked bars. A glass or metal pan works fine.
- Parchment paper: Makes lifting the bars out of the pan a breeze.
- Mixing bowls: You’ll need a few for the different layers.
- Hand mixer or stand mixer: Essential for whipping up a smooth cheesecake layer.
- Spatula: For spreading the layers evenly.
If you don’t have a hand mixer, you can use a whisk and a bit of elbow grease! Just make sure your cream cheese is softened to avoid lumps.
How to Make Strawberry Crumble Cheesecake Bars
- Preheat the oven: Set your oven to 350°F (175°C) and line your baking pan with parchment paper.
- Make the crust: Combine flour, sugar, and cold butter in a bowl. Use a pastry cutter or your fingers to mix until crumbly. Press the mixture into the prepared pan and bake for 10 minutes. Let cool.
- Prepare the cheesecake layer: Beat cream cheese and sugar until smooth. Add the egg and vanilla, and mix until just combined. Pour over the cooled crust.
- Make the strawberry filling: In a small saucepan, combine chopped strawberries, sugar, lemon juice, and cornstarch. Cook over medium heat until thickened. Let cool slightly and dollop over the cheesecake layer. Swirl gently with a knife.
- Add the crumble topping: Mix oats, flour, brown sugar, and melted butter until crumbly. Sprinkle evenly over the top.
- Bake: Bake for 35-40 minutes, or until the topping is golden and the cheesecake is set. Cool completely before slicing.
Pro tip: Chill the bars in the refrigerator for at least 2 hours for cleaner slices. It’s worth the wait!
Cooking Tips & Techniques
Here are a few tricks to help you nail this recipe:
- Don’t overmix the cheesecake layer: Overmixing can incorporate too much air, leading to cracks as it bakes.
- Use cold butter for the crust: This keeps it flaky and prevents it from becoming soggy.
- Let the filling cool before adding: Adding hot filling to the cheesecake can affect the texture.
- Chill before slicing: Patience is key for perfect bars!
Variations & Adaptations
Want to mix things up? Here are some ideas:
- Berry swap: Use blueberries, raspberries, or a mix of your favorite berries.
- Gluten-free: Swap the flour for a gluten-free blend and double-check your oats are certified gluten-free.
- Dairy-free: Use dairy-free cream cheese and plant-based butter.
One time, I added a drizzle of melted white chocolate on top after baking, and it was a game-changer!
Serving & Storage Suggestions
These bars are best served chilled or at room temperature. They pair beautifully with a dollop of whipped cream or a scoop of vanilla ice cream on the side.
To store, place them in an airtight container in the refrigerator for up to 5 days. For longer storage, freeze the bars in a single layer, then transfer them to a freezer-safe bag. They’ll keep for up to 2 months – just thaw in the fridge before serving.
Nutritional Information & Benefits
Each bar is estimated to have around 250 calories, depending on portion size. While these are an indulgent treat, they do offer some benefits:
- Strawberries: Packed with vitamin C and antioxidants.
- Oats: A source of fiber and heart-healthy nutrients.
Just be mindful of portion sizes if you’re watching your sugar or calorie intake!
Conclusion
If you’re looking for a dessert that screams summer, these Strawberry Crumble Cheesecake Bars are it. Creamy, fruity, and perfectly crumbly – they’re like a hug for your taste buds. I hope you enjoy making (and eating) these as much as I do!
Don’t forget to share your creations in the comments below. I’d love to hear about your variations or any tips you discovered while baking. Happy summer baking!
FAQs
Can I use frozen strawberries?
Yes! Just thaw and drain them before using to avoid excess liquid.
What’s the best way to slice these bars?
Chill them completely, then use a sharp knife. Wipe the knife clean between cuts for neat slices.
Can I make these bars ahead of time?
Absolutely! They taste even better the next day as the flavors meld together.
Do I have to use parchment paper?
Parchment paper makes it easier to lift the bars out of the pan, but you can grease the pan well if you don’t have any.
What if I don’t have cornstarch?
You can replace it with an equal amount of all-purpose flour for thickening the strawberry filling.